Panels
Animation
A multi-track frame timeline that any layer can link into, named frame actions for logical clips (walk, idle, attack…), parallel tracks that composite together at the same play step, and a transport with Forward / Reverse / Ping-pong playback.
← Interface overviewThe panel
Two layers, four frames — a named action ("Walk") covering the last three, Frame 3 held for 3 units instead of 1. New projects start with one track; add more by dragging frames into new lanes (see Parallel tracks).
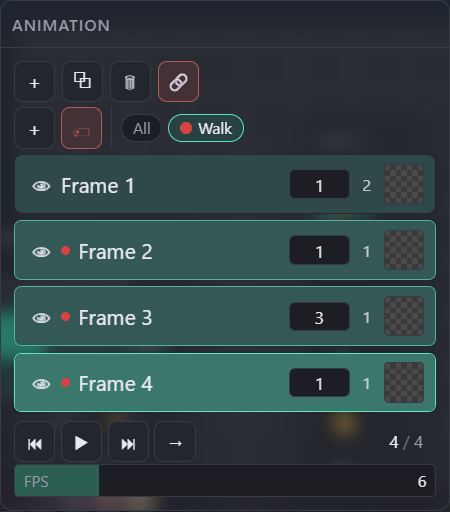
Add / Duplicate / Delete frame, and 🔗 Link — links every selected paint layer (folders expand to their nested paint layers) to every selected frame; turns red ("unlink") once the whole selection is already linked.
+ creates a named action from the current selection; 🏷 assigns/unassigns frames to the active one. Chips scope Play/export to just their frames — see states below. Sprite frame blocks can be inserted here by dragging a sprite layer (Canvas-as-sprite) from the Layers panel onto a frame; a modal lists named actions from the sprite's target canvas — pick one to insert that action's frames as a live-linked, locked block showing the sprite's sub-frame behavior synchronized to the host timeline. No named actions on the target canvas → its whole timeline inserts directly as the block, no modal. Each block also gets its own chip here (one per block instance, even for repeated copies of the same action) — click to jump to its frames. Block frames show the sprite's own image, only their eye is editable (no opacity/duration), highlight in the block's own color, and move/delete together as a whole (dragging or deleting any one member moves/removes the whole block) so each member stays aligned with its source frame; each member is its own timeline cell, same as a regular frame.
👁 visibility, thin top bar for opacity (drag), a colored dot when the frame belongs to an action, drag the cell to reorder (Shift+drag to copy), duration at bottom-left (cell width spans that many columns), linked-layer count top-right. Drag the left/right edge handles to stretch or shrink hold duration.
Hold units at the current FPS (1–999, default 1). The cell stretches across that many timeline columns; later frames on the same track are pushed so holds never overlap. Frame 3 here is set to 3 — it stays on screen 3× longer during playback and looks three slots wide.
Click selects those layers in the Layers panel; Ctrl+click unlinks every layer from the frame(s) in one step. Frame 1 shows 2 (both layers), the rest show 1 (just the layer active when they were added).
⏮/⏭ step through visible frames; ▶ plays/stops; the mode button cycles Forward → Reverse → Ping-pong.
Playback speed, 1–30 (default 6) — multiplied by each frame's own duration to get its hold time.
Frame-action chips, at a glance:
Parallel tracks
The timeline is not a single strip — each track is a horizontal lane of frames bound to a global timeline column (slots may be empty on some tracks). At a given play/export step, every visible track contributes its frame at that global column; those frames composite together on the canvas.
- Drag a frame above or below a track lane, or onto the gap between lanes, to place it on a new track.
- A track disappears when its last frame is moved away (there is always at least one track left).
- Locked tracks reject drops and frame edits from that lane.
- Sticky column beside the frame lanes: track name (double-click to rename), color swatch, eye (hide track from play/composite; Ctrl+click isolates like Layers), and lock (same icon styles as Layers).
- Drag a header to reorder tracks (top-level lane order). On play, scrub, ←→, and export that order is the canvas draw order: the top track is in front; each track still uses Layers order inside its frame. Click a frame cell to edit that frame only (Layers order).
- Drag the vertical separator left (~12px) to collapse the headers into a thin reopen tab; drag open or click the tab to restore.
- Left-drag on empty timeline content (ruler, empty slots, gaps — not on a frame cell): relative scrub from the current frame at the click point (no need to line up with the playhead).
- Shift + middle-drag or Shift + wheel — scrub over frames too (panel or canvas).
- Middle-drag (no Shift) — pan the timeline freely; content is not pinned to the left/top edge.
- F over the Animation panel — fit all tracks and frames to the current window size.
- Ctrl/Alt + right-drag on a track: vertical scales height (Shift = all tracks); horizontal scales shared slot width (zoom under cursor).
- Ctrl + wheel over the Animation window scales cells proportionally (width and height together). At min/max size the page does not zoom.
- Ctrl + right-drag on Color, Layers, Stamp library, or Atlas browser scales that window's content (same feel as canvas zoom). Layers at minimum height show an icon — hover for a preview popup.
- Scrub ruler is fixed at the top or bottom of the timeline (Settings → Timeline scrub → position) — it does not scroll with tracks. Track headers stay locked to their lanes.
- Play-range markers fill the lanes viewport height and only move with horizontal scroll; color / ruler height / position live in Settings → Timeline scrub. Playback never moves vertical scroll; cannot-play toasts name the reason.
- Invert, speed, and ease match Settings → Canvas pan & zoom (same feel as canvas drag-zoom).
- Playback and GIF/PNG sequence export step by column across all visible tracks (hidden tracks are skipped).
- Duration for a step is the longest duration among the frames in that column.
- Frame actions still scope which frames participate within each track.
- Selecting a frame (or the playhead) composites every parallel frame at the same column on other visible tracks — not only the active one.
- Tracks and frame placement are saved with the project file.
Playback modes
Click the mode button (next to ▶) to cycle. Needs at least 2 project frames, and at least one visible frame with a linked layer, to start playing at all.
- Default. Plays frame 1…N, loops back to 1.
- Plays N…1, loops back to N.
- Plays forward to the end, then backward to the start, repeating — no jump cut at the loop point.
- Select just that chip (plain click when nothing else is selected, or Ctrl+click to solo it) before pressing ▶ — Play/export follow the active scope, not the full timeline.
Gestures & shortcuts
- Drag the top opacity bar — set this frame's opacity (Shift applies to selected / whole run)
- Drag the cell — reorder within the lane, or above/below a lane / onto a gap to create or join another track
- Shift+drag — drop a copy instead of moving
- Drag across several eyes — mass-toggle visibility
- Click — select those layers in the Layers panel
- Ctrl+click — unlink every layer from the selected frame(s)
- Click — solo this action (or, if it's the only one selected already, toggle fold/unfold)
- Shift+click — add/remove from the play/export scope
- Ctrl+click — exclusive solo (disables every other action)
- Ctrl+Shift+click — add to the solo set without dropping the others
- Hold (~500ms) — delete the action (member frames stay, just unassigned)
- Drag — reorder the chip strip
- P — play / stop
- ← / → — previous / next visible frame
- Add / duplicate / delete frame, frame actions, and the mode cycle have no default hotkey — toolbar/pointer only.